The “green roof” movement is one of the more interesting contemporary building movements of our times. There are lots of famous examples, from the fascinating vertical green wall at the Musée du quai Branly in Paris to the Living Green Roof at the California Academy of Sciences in San Francisco. But most homeowners don’t realize that for a small investment of time and supplies, they too can install a green roof that brings a bit more greenery to the house, encourages bees and other wildlife to come visit, and helps improve your home’s insulation.
Although we refer to modern green roofs as contemporary home features, the concept has actually been around for centuries. The modern part is the improvement of materials that allow for much thinner and lighter roof structures.
First, it’s good to understand the basics. A green roof is simply an alteration to the structure of your home that fosters the growth of grass and other vegetation. The “ingredients” of a green roof are a waterproofing layer, a root barrier and drainage system, and soil or other growing medium for the plants. “Intensive” green roofs, also sometimes called roof gardens, can be much more intricate and can include larger plants and sometimes water features.
Where to Start
 Your first step is likely to hire a structural engineer to assess your roof, which can weight up to 40 pounds per square foot during a rainy day. The structural engineer will evaluate your roof to ensure it can handle the extra weight. The engineer may also recommend against installing a living roof if it’s particularly slanted or otherwise unsuitable for this project.
An optional step would be to have a professional gardener examine the footprint of your home in order to recommend plant life that will thrive in your sun conditions.
Unless you’re skilled at construction, you’ll also want to hire a general contractor to install a waterproof membrane and any extra insulation your roof needs. You may also need to check with your municipality to see if there are any permit requirements to alter your roof. While you’re there, it’s a good idea to see if there are any local incentive programs or government grants that might help you finance your green roof project.
It’s also a good idea to have your contractor add functional edges to the roof to ensure your vegetation doesn’t just slide off during a rainstorm.
Finally, you may be able to start anytime depending on the growing season where you live, but unless you live in a particularly temperate part of the country, you may want to launch this project during the spring planting season.
What You Need
 First, you’ll want to budget for this living roof project. The structural engineer and your contractor can give you estimates for their time in advance. Other materials are likely to run around $13 to $45 per square foot, depending on the size of your home. You’ll also want to visit the hardware store for these items:
- A heavy-duty plastic sheet, such as butyl pond liner
- Sand or gravel, or custom-made underlay sedum matting
- A sharp knife
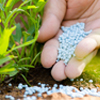
- Slow-release granular fertilizer
- Specialized sedum matting as a growing medium
Installing the Layers
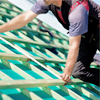
 For flat or gently sloping roofs, sedum matting is the best growing layer because it is easy to lay and maintain. Sedum mats are ideal because they come pre-prepared with mature plants in a special growing medium. Keep in mind that sedum matting is heavy and will require two or more people to lift it onto the roof.
First, you’ll lay your pond liner or other heavy-duty plastic sheet over the roof to create a waterproof root barrier. Next, add a layer of sand or gravel. Make sure your sand layer is even so you don’t have a bunch of puddles drowning your plants when it rains. Next, you’ll place your sedum matting on the roof, trimming this layer with your knife.
Maintaining the Green Roof
 It sounds obvious, but don’t walk or kneel on the plants when you’re installing these layers. You’ll also need to water these plants during dry spells until they are fully mature. Once they are fully established, your green roof should only require extra watering during drought seasons. Apply your slow-release granular fertilizer each spring and replant any areas that have become barren. Weeding should only take a few hours in the spring and fall, although most weeds have difficulty putting down roots in the dry, thin soil.
There you have it. Not only have you installed a colorful and environmentally friendly new addition to your home, you can live with the confidence that a properly maintained green roof will extend the life of your roof up to three times its normal lifespan.